Making Comments on NowComment

In this final installment of postings on NowComment, we’ll look at making comments on documents.

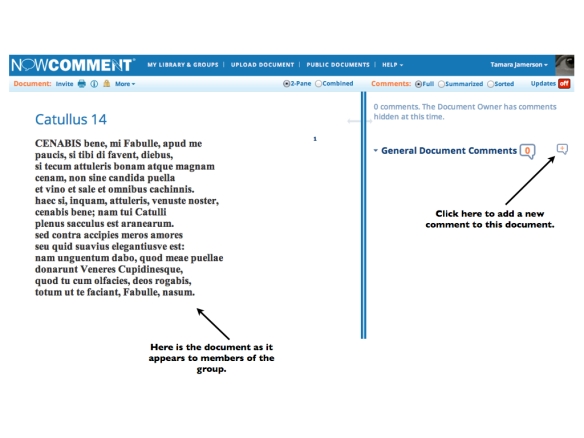
1.  Once you’ve uploaded your document, here’s the finished view:

Document/Comment View on NowComment

Image of the split-screen document/comment view.

Notice that you have a split-screen view, with the document on the left and the comments appearing on the right.  You can also choose a combined view of the document and comments (which will put the document at the top and the comments below the document).  Personally, I prefer the split-screen because I can view the comments and the text side-by-side.  By the way, the view options (i.e., 2-pane/combined) are in the middle of the toolbar at the top of the screen.

If you look on the left-hand side, you will see a small orange plus sign (+) inside a dialogue bubble.  You simply click here to add a new comment about the document.

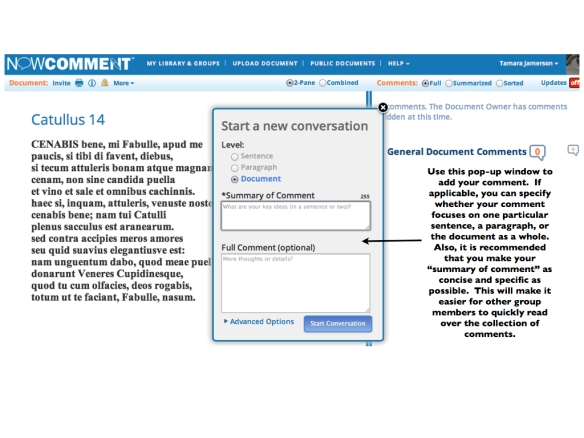
2.  The image below shows the dialogue box for making comments.

Document Comment Dialogue Box

Image shows the dialogue box for making comments in NowComment.

Notice that you have the option of commenting on a single sentence, a paragraph, or the document as a whole. Since the document in this particular example is a short poem, the only option for comments is document-level.

Also notice that there is a box for “Summary of Comment”.  In this field, you should try to give a concise and succinct summary of your comment.  This field is limited to 255 characters.  Very often, you may find (as I have) that this summary field is sufficient for the entire comment.  If, however, you have a longer comment to make, then you can continue in the “Full Comment” box.

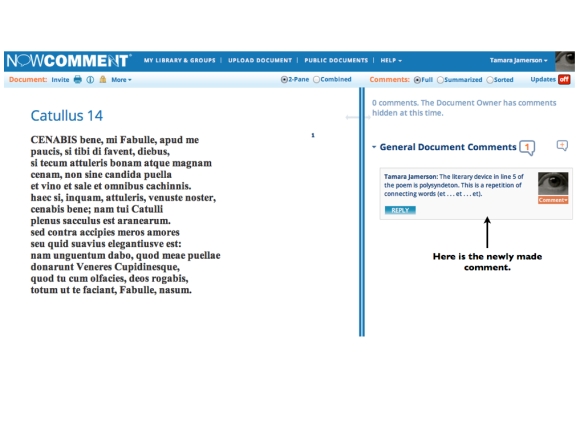
3.  Here is how your comment will appear to the left of the document pane:

Image of Comment

This is how your comment appears to the left of the document pane.

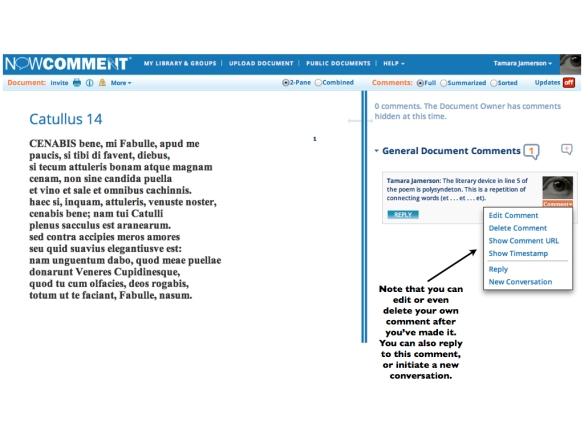
4.  Once you have made your comment, you still have options to edit or delete your comment.  This is a nice feature, especially if you detect a mistake in your comment.  If your document has been set up so that all comments are not immediately invisible to everyone, it’s nice to be able to edit/delete before all members of the group see it.

Comment Options

This image shows the options available for comments you have already made.

So what are some suggestions for using NowComment with high school students?  Upload primary historical documents for discussion in a history class; English literature classes can discuss poetry, essays, and other literary works; foreign language classes can use this tool to discuss and analyze literature and texts in the target language; students can upload and share their own creative writing projects with the class.

So, let those dynamic classroom discussions continue with NowComment!

Uploading a Document in NowComment

In the previous post on NowComment we discussed how to set up a new group and generate e-mail invitations for members to join the group.  The next step towards being able to discuss a document in NowComment is to upload the document.

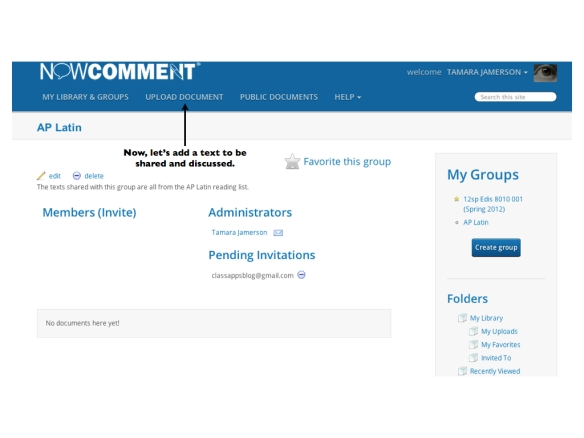
1.  Start by clicking on “Upload Document”.

NowComment Page - Upload Document

This image illustrates how to begin uploading a document.


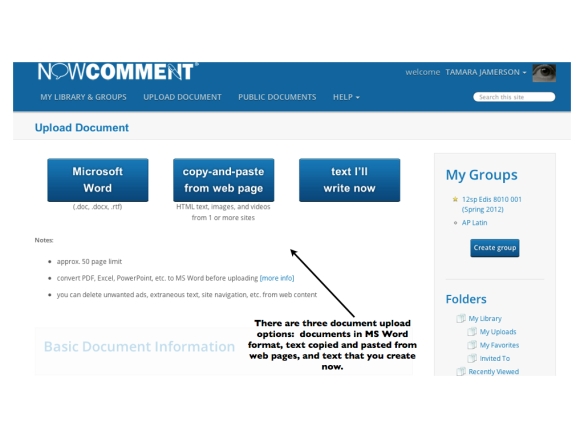
2.  Choose one of three options for document upload.  You can upload a Word-format file, copy and paste text from a web page, or create your own text.

NowComment - Upload Document Options

This image shows the three options for uploading a document – upload as Word file, copy and paste text from the web, or create text.

Nota Bene:  If you upload a document from your files, it must be in Word format.  So, if your file is in PDF, Power Point, Excel, etc., you will need to convert it to Word.

If you copy and paste text from a web page, make sure you are not copying from a PDF, Power Point, Excel file etc., since this may pose a problem for how the text appears in NowComment.

Also, there is a limit as to the length of the document you can upload to NowComment.  It is 50 pages.


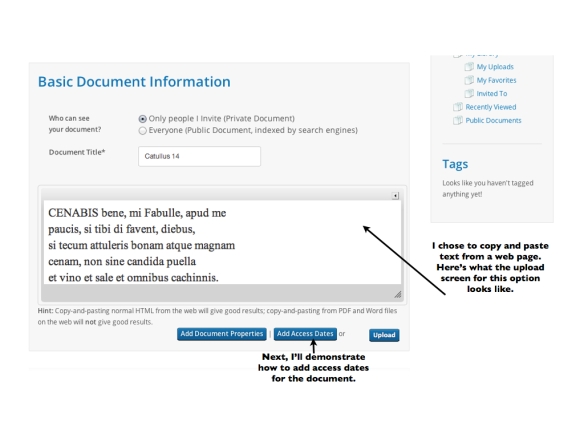
3.  For this demonstration, I chose the “Copy and Paste Text” option.  Here’s how the screen for this option looks:

NowComment Copy and Paste Text

This image demonstrates the process for copying and pasting text from a web page.

Notice that you can either set the document to private, which means only those individuals you invite to the group can see and comment on the document.  You can also choose the public option, which means anyone using NowComment can view and comment on the document.  When working with high school students, I recommend the private setting.  This will protect your class from any unwanted intrusions.

Another important step at this point is to set access dates (click on the “Add Access Dates” button at the bottom of the text box).  Adding access dates will allow you to control the begin/end dates of the document’s availability, determine when comments can begin/end, and also determine when all comments from all group members will be revealed.  I very much like the ability to have all comments remain hidden until students have had time to read and comment on the document.  In this way, students can focus on their own thoughts and interpretations about the document, without being distracted or swayed by popular opinion.


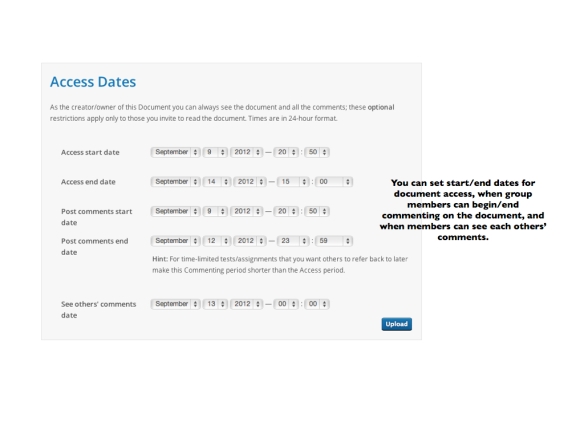
4.  Here is the “Add Access Dates” option:

NowComment - Access Dates Page

This image shows the various settings under the “Access Dates” option.


Once you’ve completed the above steps, your document will be ready for viewing and commenting.

Next post:  Viewing and commenting on documents.

How to Set Up a New Group in NowComment

In becoming acquainted with NowComment, the first step I’d like to address is setting up a group.  You will need to set up a group in order to share and discuss documents.

You will need the e-mail address of each person you would like to invite as a member of your group.  If you wish to use NowComment with high school students, be aware of the fact that some students may not have their own e-mail account, or may not be allowed to give out their e-mail address.  Also, some students may not have computer/internet access at home.  I know this possibility may seem far-fetched in this day and age of digital connectivity, but I have had this experience with a few of my own students.  You may either want to touch base with parents and let them know what you’re doing with this tool before asking their child for an e-mail address, or you may want to make participation in NowComment discussions an optional activity outside class time (i.e, not required for a grade).  Of course, by making participation optional, there is the risk of not having enough participation among those who do have e-mail/internet connectivity.  At any rate, each instructor must consider the resources that are available to his/her students, and determine for him/herself what is the best way in which to use this tool as part of an overall course.

Now, to proceed with setting up a new group:

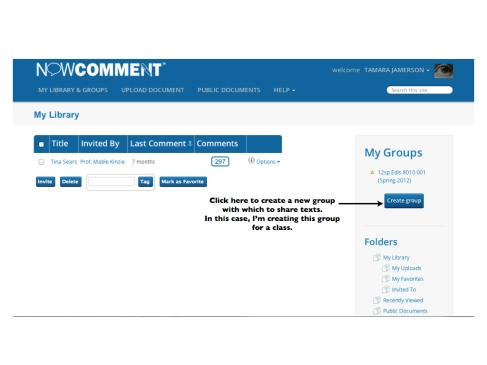
1.  Once you’ve logged into your account at NowComment (which means you will already have set up a new user account first), click on “Create Group” under “My Groups” on the left-hand side of the page:

Image

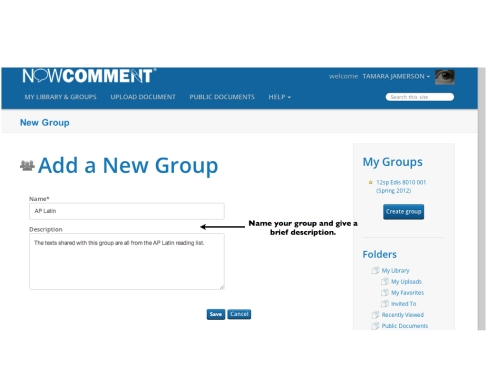
2.  Next, give your group a name and include a brief description if you wish:

Image

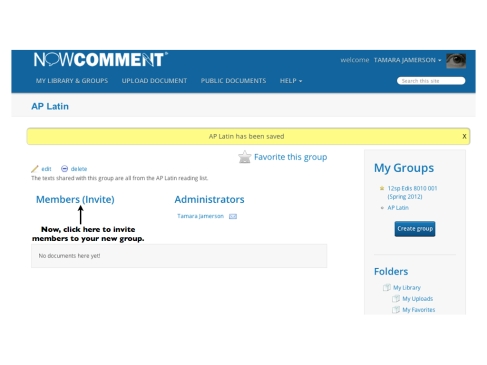
3.  You’ll next need to invite individual members to your group (click on “invite” in parentheses, next to “members”):

Image

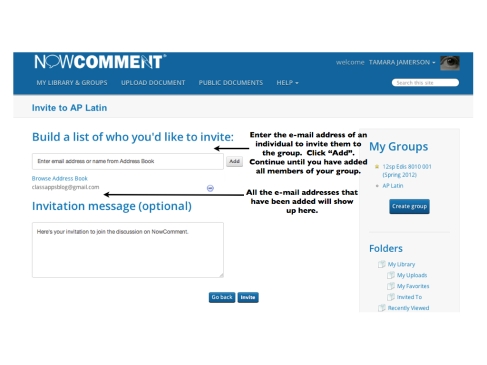
4.  Here’s where you’ll need the e-mail addresses of all the individuals you would like to invite to your group:

Image

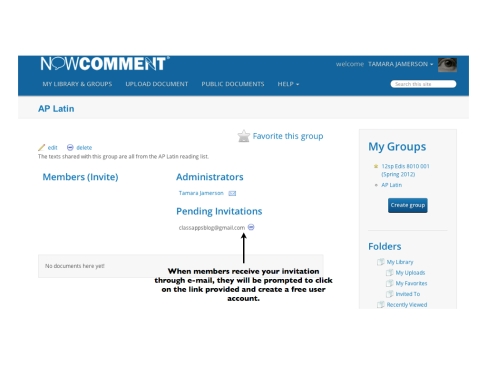
5.  Once you’ve added all the e-mail addresses, you’ll see a page which displays all the pending invitations.  Each member of your new group will receive an e-mail invitation which will provide them with a link.  They will use this link to go to NowComment and set up a free user account.  This will enable them to access all documents for this group.

Image

And that’s it for creating a new group!  In the next post, I’ll cover uploading a document for your group to discuss.

NowComment

First of all, I’d like to thank those readers who left me several positive and encouraging comments on my earlier blog posts.  As someone new to this type of communication, I appreciate the encouragement.

Let’s now proceed to a discussion of NowComment (www.nowcomment.com).

NowComment Header/Banner

This is the title banner from the NowComment web site.

This web tool (which is free to register for and use, by the way) allows members of a group to conduct an interactive online discussion of a document by making comments on the document and also by responding to each others’ comments.

I first became acquainted with this tool while taking a graduate-level instructional design course.  The president of NowComment, Dan Doernberg, visited our class and discussed with us its features and potentials for facilitating online discussion of documents in context.

One of the things I like most about this tool is the ability to view the original document side by side with the group members’ comments.  This greatly reduces the hassle of having to search the text for the part that is being referenced.  I also like the fact that you can make a comment not only about the document overall, but you can also narrow it down to the paragraph and even the sentence level of granularity.

I can see this tool as being useful not only for college classes, but also for high school level courses.  It allows and encourages students to continue to engage in meaningful discussion outside the confines of the traditional classroom.  Conversely, the discussions held in the online setting of NowComment can also facilitate the face-to-face class discussions.  With class time at a premium, thereby requiring instructors to make every minute with their students count, NowComment could be yet another useful tool in the educator’s arsenal.

Now that I’ve presented a very general overview of the tool in this blog entry, I will proceed in the next few installments to demonstrate:

1.)  How to set up a new group in NowComment,

2.)  How to upload a document to share for discussion, and

3.)  How to make comments on the document.

Have you already been using NowComment in your classes?  Please share your experiences, either by replying to this post or by e-mail at classappsblog@gmail.com.