My Favorite Apps (September 2012)

Continuing the list of my favorite apps from the previous post, let’s take a look at a few more:

6.  Storybird

This is a great app for creating your own online storybooks.  You provide your own story, then illustrate it using the unique and original artwork provided by real artists.  You can read your books (and others’ books) online.  You can also pay to have your book turned into a printed version, or you can choose to print and fold your own mini-books at home for a small fee.  Storybird is a great app for encouraging students to create and write their own stories and books.  For a sample, take a look at one of the “storybirds” I created using this app (click on “Was That Me?” below):

Was That Me? by jamersontd on Storybird

7.  Prezi

Tired of creating traditional slide show presentations?  Try out Prezi for a creative, non-linear approach to the slide show.  You can collaborate to create a presentation with other users, share your presentation on social networks, and even download your presentation for offline viewing.  The zoom-in/zoom-out feature adds a dynamic feel to the more static and linear slide show.  With Prezi you can also upload multimedia files such as images and video clips to your presentation.  Click on the following link to see an example:

http://prezi.com/8t9kli63w56s/parlez-vous-web-20/

8.  Learnist

Learnist has quickly become one of my favorite web apps.  With this tool, you can bring together resources from all over the web to create “learn boards”, then share these boards with other users.  You can also use your own original images (such as slides from a slide show or photos you’ve taken) to create boards.  You can share your boards through social networks such as Facebook and Twitter.  In addition, you can easily add new “learnings” to your boards at any time, thus making it a more dynamic experience.  What’s also nice is that you can follow other users and learn about new topics.  Take a look:

http://learni.st/users/tamara.jamerson.7/boards/5331-ancient-rome-in-the-news    

9.  Animoto

Animoto allows users to create their own videos by combining images and music.  There are several themes/backgrounds from which to choose, as well as a wide selection of music tracks.  You can also upload your own audio tracks to use.  There is an educator’s version of this app, as well as paid subscription plans.  You can share your finished videos on Facebook/Twitter, as well as download and save a copy to your computer.  Here’s a link to a short video created by some of my Latin students:

http://animoto.com/play/Z44q9QTWLfVcgR05mieTRg

10.  TerraClues

Send your students on a geographical scavenger hunt with TerraClues.  This app uses Google maps to take your students on scavenger hunts anywhere in the world.  Write your own hints and upload images to help your students zoom in on the correct location.  You can map the migratory patterns of birds for a science class, locate major battles of the civil war for history, or visit the landmarks of ancient Rome for Latin class!  You can also locate and use scavenger hunts that other users have created.  Check out this TerraHunt about ancient Rome:

http://www.terraclues.com/PlayHunt.aspx?HuntID=2574


My Favorite Apps (September 2012)

Since this is the end of the first full month of school for many, I thought now would be a good time to share a list of the apps that are currently my favorites.  Let’s take a look!

1.  Piktochart

An Infographic showing the types of languages (other than English) spoken in the US.

An Infographic showing the types of languages (other than English) spoken in the US.

A great site for creating infographics.  In fact, the image above is an infographic I created using Piktochart for incorporation into an educational technology conference proposal.  There are several basic templates to choose from if you register to use the site for free.  You are allowed to upload up to five of your own images to incorporate into your infographic.  You can customize your infographic by changing fonts, color themes, shapes, etc.  Even more templates and options for customization are available for paid members.

2.  Popplet

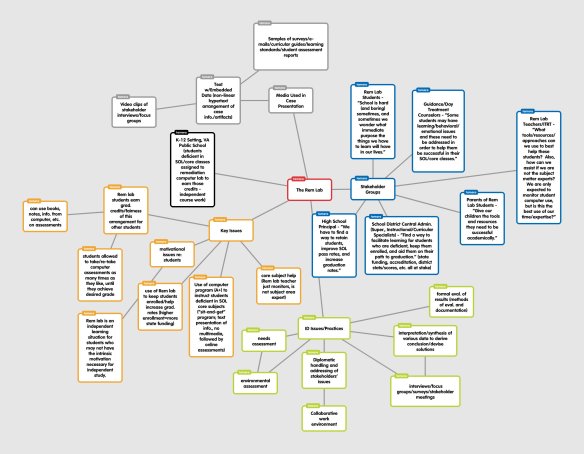
A "Popplet" of an instructional design case story map.

A “Popplet” of an instructional design case story map.

Popplet is a terrific app for mind mapping activities.  You can even incorporate multimedia features such as images and video clips.  This tool also allows you to brainstorm with others by adding them as collaborators to your popplet.  You can work either synchronously or asynchronously.  Once you’ve finished, you can also share your completed popplet by sharing a public link on Facebook and Twitter, or link it to an existing web page or blog.  You can also export as a jpeg or pdf document, or go “old school” style and print it out.

3.   Lucidchart

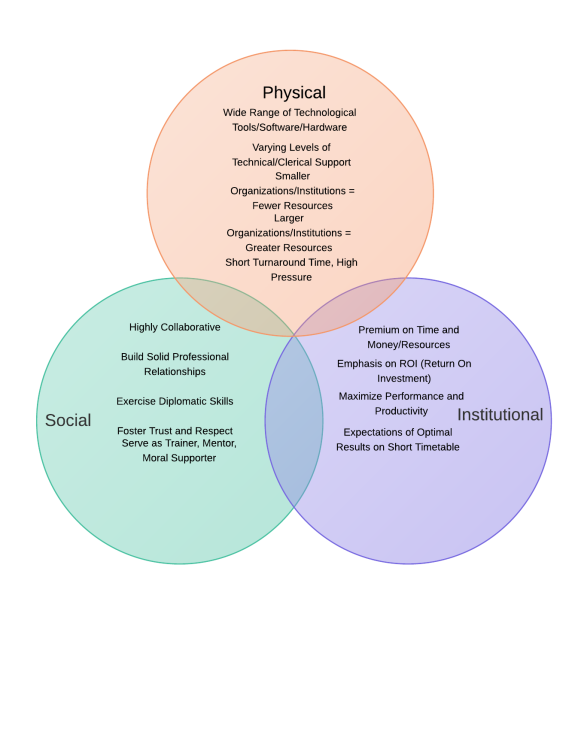
A Venn Diagram, created with Lucidchart

This is a Venn Diagram created with Lucidchart.

Lucidchart allows users to create flow charts, Venn diagrams, mind maps, wireframes, etc. quickly and easily.  You can sign up for a free account, which is sufficient for anyone who has an occasional need to create diagrams.  Also, all documents created are easily shared through social media such as Facebook and Twitter, via e-mail, by exporting as a PDF or png file, or even by printing.  And, the really great thing about this app is that it allows users to collaborate in real-time on diagrams.

4.  Go!Animate

Go!Animate is a fun site that allows users to create their own animated videos using character collections and backgrounds.  Users can choose to select a computer synthesized voice for their characters (simply type in the dialogue and the selected voice will say them), or they can even record their own voices!  The process for creating videos is quick and easy, and the user interface for this app is quite intuitive.  Your finished video can be shared via a link, embed code, or can be uploaded to YouTube as well as shared on Facebook and Twitter.  You can also download and save your video for viewing offline.  Here’s a short Star Trek themed video I made.  Simply click on the “Return of the Gorn” link below to view.

GoAnimate.com: Return+of+the+Gorn by jamersontd

Like it? Create your own at GoAnimate.com. It’s free and fun!

5.  Dipity

Dipity is a timeline creation tool that allows users to incorporate multimedia features such as images and video clips.  So, instead of a timeline that contains just words, a Dipity timeline can show images and clips as well.  You can view your finished timeline in the timeline format, or you can choose to view it as a flip book or as a chronological list of events.  Dipity also has a social aspect in that you can follow others’ timelines, you can “like” timelines, leave comments, as well as share your timeline on Twitter and Facebook.  Check out this timeline I’ve created by clicking on “Star Trek”:

Star Trek on Dipity.

More of my favorite tools will be shared on the next post!

How to Set Up a New Group in NowComment

In becoming acquainted with NowComment, the first step I’d like to address is setting up a group.  You will need to set up a group in order to share and discuss documents.

You will need the e-mail address of each person you would like to invite as a member of your group.  If you wish to use NowComment with high school students, be aware of the fact that some students may not have their own e-mail account, or may not be allowed to give out their e-mail address.  Also, some students may not have computer/internet access at home.  I know this possibility may seem far-fetched in this day and age of digital connectivity, but I have had this experience with a few of my own students.  You may either want to touch base with parents and let them know what you’re doing with this tool before asking their child for an e-mail address, or you may want to make participation in NowComment discussions an optional activity outside class time (i.e, not required for a grade).  Of course, by making participation optional, there is the risk of not having enough participation among those who do have e-mail/internet connectivity.  At any rate, each instructor must consider the resources that are available to his/her students, and determine for him/herself what is the best way in which to use this tool as part of an overall course.

Now, to proceed with setting up a new group:

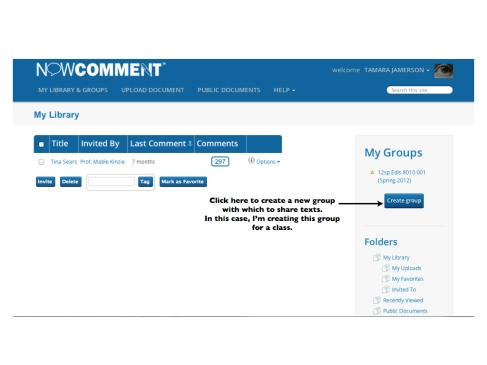
1.  Once you’ve logged into your account at NowComment (which means you will already have set up a new user account first), click on “Create Group” under “My Groups” on the left-hand side of the page:

Image

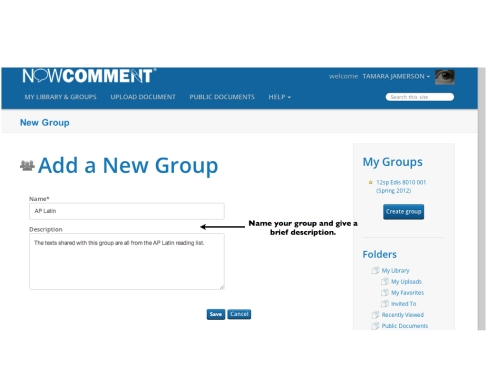
2.  Next, give your group a name and include a brief description if you wish:

Image

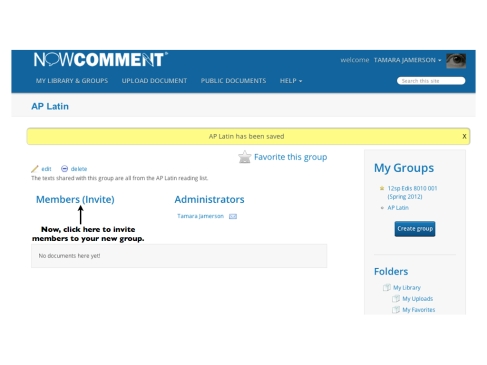
3.  You’ll next need to invite individual members to your group (click on “invite” in parentheses, next to “members”):

Image

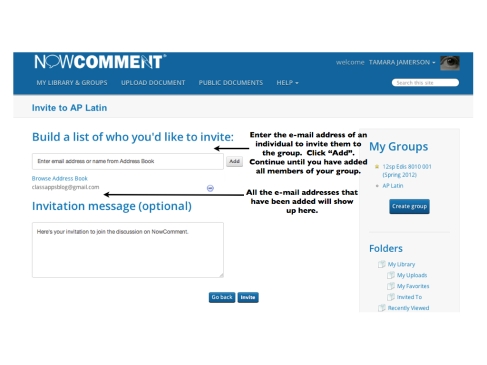
4.  Here’s where you’ll need the e-mail addresses of all the individuals you would like to invite to your group:

Image

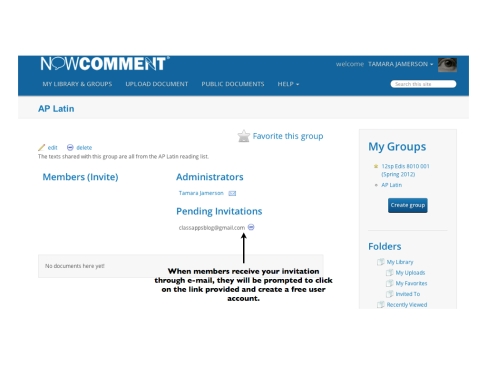
5.  Once you’ve added all the e-mail addresses, you’ll see a page which displays all the pending invitations.  Each member of your new group will receive an e-mail invitation which will provide them with a link.  They will use this link to go to NowComment and set up a free user account.  This will enable them to access all documents for this group.

Image

And that’s it for creating a new group!  In the next post, I’ll cover uploading a document for your group to discuss.

NowComment

First of all, I’d like to thank those readers who left me several positive and encouraging comments on my earlier blog posts.  As someone new to this type of communication, I appreciate the encouragement.

Let’s now proceed to a discussion of NowComment (www.nowcomment.com).

NowComment Header/Banner

This is the title banner from the NowComment web site.

This web tool (which is free to register for and use, by the way) allows members of a group to conduct an interactive online discussion of a document by making comments on the document and also by responding to each others’ comments.

I first became acquainted with this tool while taking a graduate-level instructional design course.  The president of NowComment, Dan Doernberg, visited our class and discussed with us its features and potentials for facilitating online discussion of documents in context.

One of the things I like most about this tool is the ability to view the original document side by side with the group members’ comments.  This greatly reduces the hassle of having to search the text for the part that is being referenced.  I also like the fact that you can make a comment not only about the document overall, but you can also narrow it down to the paragraph and even the sentence level of granularity.

I can see this tool as being useful not only for college classes, but also for high school level courses.  It allows and encourages students to continue to engage in meaningful discussion outside the confines of the traditional classroom.  Conversely, the discussions held in the online setting of NowComment can also facilitate the face-to-face class discussions.  With class time at a premium, thereby requiring instructors to make every minute with their students count, NowComment could be yet another useful tool in the educator’s arsenal.

Now that I’ve presented a very general overview of the tool in this blog entry, I will proceed in the next few installments to demonstrate:

1.)  How to set up a new group in NowComment,

2.)  How to upload a document to share for discussion, and

3.)  How to make comments on the document.

Have you already been using NowComment in your classes?  Please share your experiences, either by replying to this post or by e-mail at classappsblog@gmail.com.

Interactive Whiteboard Apps

I am devoting this posting to the topic of interactive whiteboard apps and how they can be used in the classroom.  I ran across several of these types of apps while searching the iTunes App Store, but I will limit my discussion to just one, namely ShowMe (www.showme.com).

ShowMe Web Page Screen Shot

ShowMe allows users to share with the world what they know about any subject or topic by recording their voice, incorporating writing and drawings, and even importing images.  The result is a dynamic, multimedia presentation that can be accessed anytime, anywhere.   This makes ShowMe ideal for educational use, since teachers can record a lesson, upload it to the ShowMe site, and students can access it whenever they need it.  This is a real plus for the student who may need additional explanation or enrichment on a topic at home or, at the other end of the spectrum, the student who is ready to advance in their studies.

The user interface for ShowMe is so simple and intuitive that students will be able to begin creating their own ShowMes in a matter of minutes, with little to no instruction in how to use the app.  This is an ideal tool for millennial generation learners, since they prefer active, creative experiences to being passive consumers of content.  Also, students can share ShowMe with their peers, which fulfills another need of this generation — the need for social connectivity and interaction.

ShowMe can be accessed on mobile devices, such as iPad and iPhone, but it can also be accessed via the web on desktop and laptop computers.  This versatility allows access for individuals via mobile devices, but also allows ShowMe projects to be shared with an entire classroom of students through a computer projection unit setup.  This brings “show and tell” into the 21st century and, since it’s a free app, there’s no concern over software compatibility from one computer to the next.  My personal experience with this is having students who create slide show presentations at home using OpenOffice, but not realizing that these files are incompatible with Microsoft Office software apps such as Power Point (which is what is used on school computers).

Now that I’ve explained a little about what ShowMe is, I’d like to show you step-by-step how easy it is to create your own ShowMe on iPad:

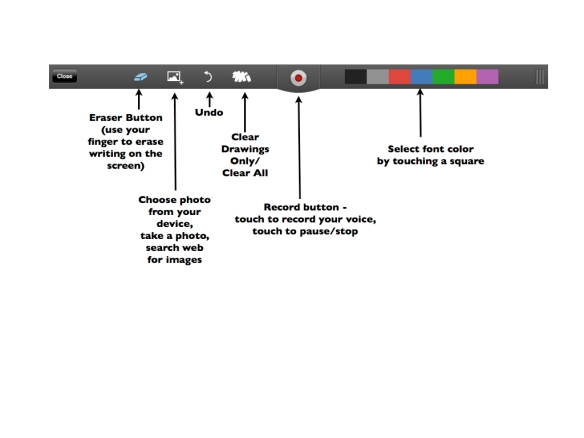
1.  When you first open up the app, you’ll see the toolbar along the top of the whiteboard (if you’re holding your iPad in landscape orientation).  See the illustration below for an explanation of each icon on the toolbar:

ShowMe Toolbar

Detailed explanation of icons on the ShowMe app’s toolbar.

As you can see, the toolbar is very basic and straightforward, which allows for an intuitive, user-friendly experience.  You spend little to no time up front learning to use the app; instead, your time is better spent on the topic you’re interested in sharing with others.

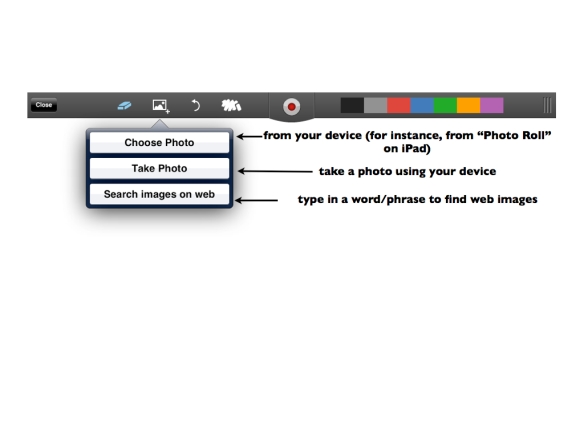
2.  I’d like to briefly show you the options for the “Add Image” button, since this is the most complex function on the toolbar (you have three options here!):

ShowMe Screen Shot, "Add Photo" function

ShowMe Screen Shot, “Add Photo” function

As you see in the screen shot above, you can incorporate photos/images from your own collection on your device, you can take a photo using your device, or you can search for images on the web using the search tool provided within the ShowMe app.

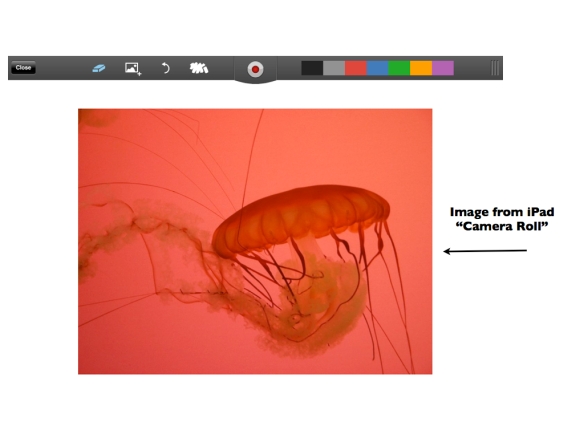
In creating a ShowMe project, I decided to include a picture of a jellyfish I had taken while at Shedd Aquarium in Chicago.  Since the photo is on my iPad, I selected “Choose Photo” (the first option in the menu from the above illustration).

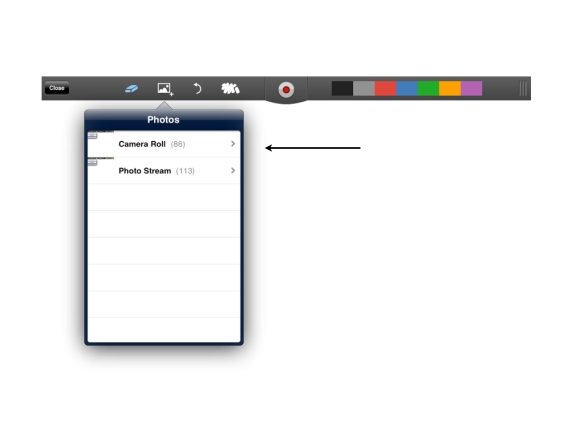
3.  Next, I selected “Camera Roll” (again, the first option on the pull-down menu):

ShowMe Screen Shot, Add Image Tool

ShowMe Screen Shot, Add Image Tool

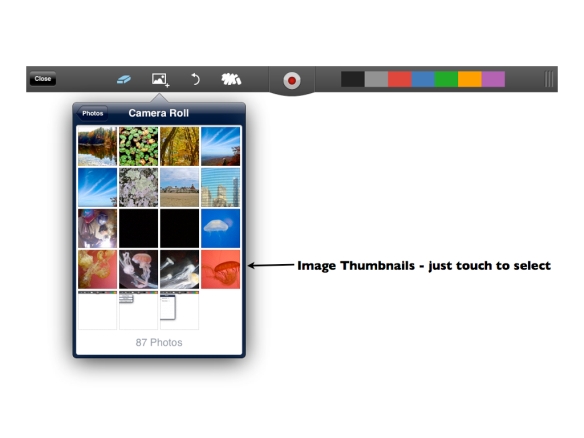
4.  After selecting “Camera Roll”, you’ll see thumbnails of your photos.  Just make your selection, and the image will appear on the whiteboard.

ShowMe Screen Shot, Camera Roll Image Thumbnails

ShowMe Screen Shot, Camera Roll Image Thumbnails

Here’s the result below:

ShowMe Screen Shot, Imported Image

Illustrates the result of importing an image from iPad’s “Camera Roll”.

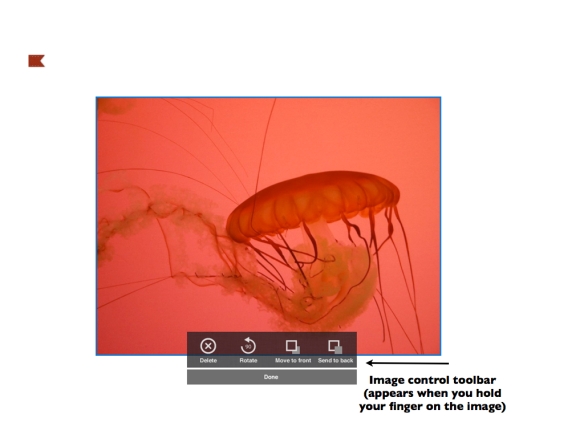
5.  At this point, you can rotate your image, move it to the foreground/background, or even delete it.  Just start by holding your finger down on the image.  This will bring up a small toolbar at the bottom of the image, containing these options:

ShowMe Screen Shot, Image Control Menu

Shows the image control menu in ShowMe, accessed by holding the finger down on the image.

Also by holding your finger on the image, you can move the image around on the whiteboard, as well as reduce/enlarge it (to reduce/enlarge, simply slide your thumb and forefinger together/apart in a pincer position; this is the same motion you would use to reduce/enlarge images/web pages anywhere else on your iPad).

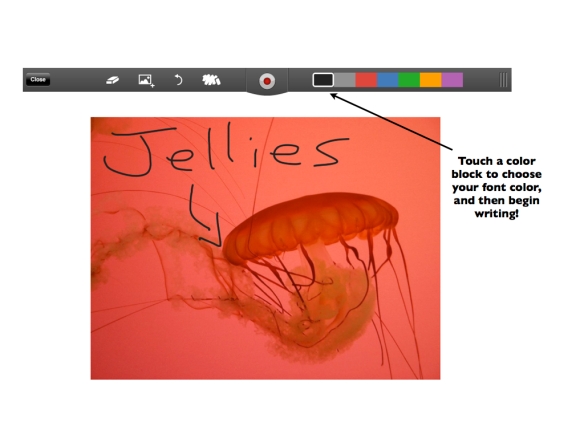
6.  Finally, you can write anywhere on or around the image that you’ve inserted into your ShowMe.  So, you can record your voice to explain your topic while you write on/around your image to enhance your explanation.  Nota Bene:  I advise you to add the images you will use first before you begin recording your ShowMe.  As I was experimenting with the app, I noticed that when I tried to add an image while recording, the action of selecting this toolbar function paused the recording.  However, you can still write/erase/change font colors while recording.  You can also reduce/enlarge/move your images around on the whiteboard while recording.

ShowMe Screen Shot, Image and Text

Illustrates the app’s ability to combine images and handwriting as the user explains the topic.

Now that you’ve seen just how easy it is, start making some ShowMe’s to share!

Ideas for Classroom Use:

Math:  Illustrate and explain mathematical problem solving step-by-step; use to graph equations

English/World Languages:  Explain parts of speech; diagram sentences; perhaps even tell a short story

Science:  Make presentations on animals, weather phenomena, geology, anatomy, etc.

I’d love to hear about your ideas for using this app.  Add a comment to this posting, and share!

Welcome to ClassApps!

Welcome to ClassApps!  It’s the start of another school year, and I have decided that this is the perfect time to debut my blog on matters of educational technology.  My goal for this blog is to share useful (and cool) technology applications that can be used in the classroom.  My hope is that readers of this blog will also share their ideas for technology use in the classroom, thereby making this a more interactive and collaborative experience for everyone.

As a middle/high school Latin teacher for over 12 years, technology became for me an indispensable tool in my repertoire of instructional aids.  Initially, I began using technology in my teaching simply as a way to grab students’ attention.  I was desperate to make an ancient language come alive for my millennial generation learners, and I quickly realized that the traditional approach of “drill and kill” alone would not accomplish this.  However, as my expertise grew (along with the availability of web-based tools and apps), I discovered that technology in the classroom could be more than just a “bells-and-whistles” gimmick.  Therefore, I began a quest to achieve complete integration of technology into my instruction.  My aim became not merely to use technology for its own sake, but rather to integrate it into my instruction as a tool and to facilitate learning.  After all, technology should not be the main attraction in the classroom.  Instead, its use should enable and empower students in the complex process of learning.

So, whether you are a digital native or an immigrant (like me!), it is my hope that everyone who finds their way to this blog will take away something they can use.

One final thing:  just in case anyone is unfamiliar with the terms “millennial generation”, “digital native”, and “digital immigrant”, here’s further information:

Technology_as_a_Tool_for_Engaging_NetGen_Students Revised (This is a slideshow I created for a technology session at a conference.  It gives a brief overview of the characteristics of millennial generation students.)

Howe, Neil, and William Strauss.  Millennials Rising: The Next Great Generation.  New York: Vintage, 2000.  Print.

(Howe and Strauss are the originators of the phrase “millennial generation”)

http://tinyurl.com/65gej7h (Article:  “Digital Natives, Digital Immigrants”, Marc Prensky)

Best wishes for a great start to the school year!

NEXT POST:  Whiteboard Apps for Mobile Devices