My Favorite Apps (September 2012)

Continuing the list of my favorite apps from the previous post, let’s take a look at a few more:

6.  Storybird

This is a great app for creating your own online storybooks.  You provide your own story, then illustrate it using the unique and original artwork provided by real artists.  You can read your books (and others’ books) online.  You can also pay to have your book turned into a printed version, or you can choose to print and fold your own mini-books at home for a small fee.  Storybird is a great app for encouraging students to create and write their own stories and books.  For a sample, take a look at one of the “storybirds” I created using this app (click on “Was That Me?” below):

Was That Me? by jamersontd on Storybird

7.  Prezi

Tired of creating traditional slide show presentations?  Try out Prezi for a creative, non-linear approach to the slide show.  You can collaborate to create a presentation with other users, share your presentation on social networks, and even download your presentation for offline viewing.  The zoom-in/zoom-out feature adds a dynamic feel to the more static and linear slide show.  With Prezi you can also upload multimedia files such as images and video clips to your presentation.  Click on the following link to see an example:

http://prezi.com/8t9kli63w56s/parlez-vous-web-20/

8.  Learnist

Learnist has quickly become one of my favorite web apps.  With this tool, you can bring together resources from all over the web to create “learn boards”, then share these boards with other users.  You can also use your own original images (such as slides from a slide show or photos you’ve taken) to create boards.  You can share your boards through social networks such as Facebook and Twitter.  In addition, you can easily add new “learnings” to your boards at any time, thus making it a more dynamic experience.  What’s also nice is that you can follow other users and learn about new topics.  Take a look:

http://learni.st/users/tamara.jamerson.7/boards/5331-ancient-rome-in-the-news    

9.  Animoto

Animoto allows users to create their own videos by combining images and music.  There are several themes/backgrounds from which to choose, as well as a wide selection of music tracks.  You can also upload your own audio tracks to use.  There is an educator’s version of this app, as well as paid subscription plans.  You can share your finished videos on Facebook/Twitter, as well as download and save a copy to your computer.  Here’s a link to a short video created by some of my Latin students:

http://animoto.com/play/Z44q9QTWLfVcgR05mieTRg

10.  TerraClues

Send your students on a geographical scavenger hunt with TerraClues.  This app uses Google maps to take your students on scavenger hunts anywhere in the world.  Write your own hints and upload images to help your students zoom in on the correct location.  You can map the migratory patterns of birds for a science class, locate major battles of the civil war for history, or visit the landmarks of ancient Rome for Latin class!  You can also locate and use scavenger hunts that other users have created.  Check out this TerraHunt about ancient Rome:

http://www.terraclues.com/PlayHunt.aspx?HuntID=2574


My Favorite Apps (September 2012)

Since this is the end of the first full month of school for many, I thought now would be a good time to share a list of the apps that are currently my favorites.  Let’s take a look!

1.  Piktochart

An Infographic showing the types of languages (other than English) spoken in the US.

An Infographic showing the types of languages (other than English) spoken in the US.

A great site for creating infographics.  In fact, the image above is an infographic I created using Piktochart for incorporation into an educational technology conference proposal.  There are several basic templates to choose from if you register to use the site for free.  You are allowed to upload up to five of your own images to incorporate into your infographic.  You can customize your infographic by changing fonts, color themes, shapes, etc.  Even more templates and options for customization are available for paid members.

2.  Popplet

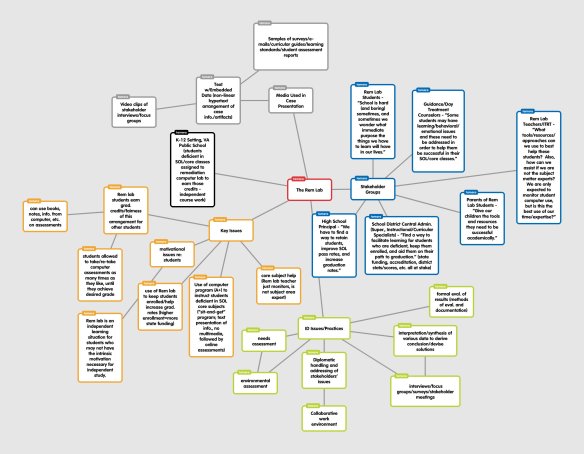
A "Popplet" of an instructional design case story map.

A “Popplet” of an instructional design case story map.

Popplet is a terrific app for mind mapping activities.  You can even incorporate multimedia features such as images and video clips.  This tool also allows you to brainstorm with others by adding them as collaborators to your popplet.  You can work either synchronously or asynchronously.  Once you’ve finished, you can also share your completed popplet by sharing a public link on Facebook and Twitter, or link it to an existing web page or blog.  You can also export as a jpeg or pdf document, or go “old school” style and print it out.

3.   Lucidchart

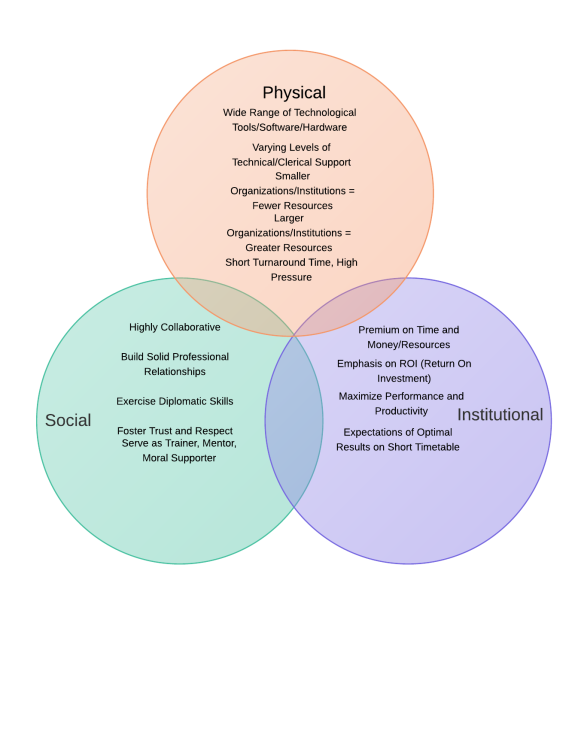
A Venn Diagram, created with Lucidchart

This is a Venn Diagram created with Lucidchart.

Lucidchart allows users to create flow charts, Venn diagrams, mind maps, wireframes, etc. quickly and easily.  You can sign up for a free account, which is sufficient for anyone who has an occasional need to create diagrams.  Also, all documents created are easily shared through social media such as Facebook and Twitter, via e-mail, by exporting as a PDF or png file, or even by printing.  And, the really great thing about this app is that it allows users to collaborate in real-time on diagrams.

4.  Go!Animate

Go!Animate is a fun site that allows users to create their own animated videos using character collections and backgrounds.  Users can choose to select a computer synthesized voice for their characters (simply type in the dialogue and the selected voice will say them), or they can even record their own voices!  The process for creating videos is quick and easy, and the user interface for this app is quite intuitive.  Your finished video can be shared via a link, embed code, or can be uploaded to YouTube as well as shared on Facebook and Twitter.  You can also download and save your video for viewing offline.  Here’s a short Star Trek themed video I made.  Simply click on the “Return of the Gorn” link below to view.

GoAnimate.com: Return+of+the+Gorn by jamersontd

Like it? Create your own at GoAnimate.com. It’s free and fun!

5.  Dipity

Dipity is a timeline creation tool that allows users to incorporate multimedia features such as images and video clips.  So, instead of a timeline that contains just words, a Dipity timeline can show images and clips as well.  You can view your finished timeline in the timeline format, or you can choose to view it as a flip book or as a chronological list of events.  Dipity also has a social aspect in that you can follow others’ timelines, you can “like” timelines, leave comments, as well as share your timeline on Twitter and Facebook.  Check out this timeline I’ve created by clicking on “Star Trek”:

Star Trek on Dipity.

More of my favorite tools will be shared on the next post!

Learnist: Create Your Own Learning Boards

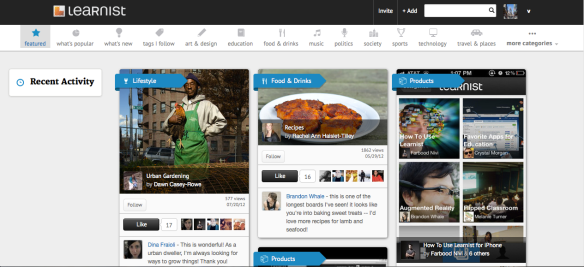
Screen Shot of the Learnist Home Page

This is a screen shot of the Learnist home page.

In this post I’d like to share with you a web tool that I just began using:  Learnist (learni.st).  Using Learnist, you can share with others what you know by creating a “learning board”.  Basically, you can bring together sites from all over the web to include in your board and write your own caption explaining each site.  You can also make a board using your own learning, which means you can upload your own photos/images from your computer and write captions for them.  You can also save slide shows as JPG files (i.e., each separate slide will be saved as a JPG image) and upload them as images for your learning board.  In this way, you can create a learning board that is composed entirely of your own original material.

Learnist has elements of the traditional slide show, coupled with the social capabilities of networks like Facebook, Twitter, and Pinterest.  As I stated earlier, you can gather together resources from around the web (or use your own original material) to teach your audience about a topic.  Your audience can then “like” your board, or specific “learnings” within the board, and also leave comments.  And, like Twitter, your audience can follow your boards (and you can follow others’ boards as well).

At this time Learnist is in the beta phase, which means that you must first request an “invite” to be allowed to create content on the site.  It takes approximately 2-3 days for approval, and this approval is based on your “online presence” (as was stated in the e-mail I received).  If you do not wish to request an invite to create content, you can still browse the learning boards, follow/”like” boards, and post comments.  In addition to the web site, there is also the free Learnist app for iPad/iPhone.  Through this app you can browse and access boards for commenting, “likes”, and following, but it would seem that you cannot create a board from this app.  You must use the web site for creating a board.

In my next post about Learnist, I will take you through the steps of creating your own learning board.  In the meantime, go to learni.st and browse the boards, or check out these boards I’ve recently created:

http://tinyurl.com/9tgnbqj (A collection of the BBC series “Horrible Histories” video clips from YouTube.)

http://tinyurl.com/8u3rjjr (I created the images on this board by using Power Point, then saved the slides as JPG files and uploaded to Learnist.) 

http://tinyurl.com/8uh8ob3 (A collection of web sites that can be used to take students on a virtual field trip through ancient Rome.)


Interactive Whiteboard Apps, Continued

I wish to continue my discussion of interactive whiteboard apps for mobile devices by focusing now on Educreations (www.educreations.com).

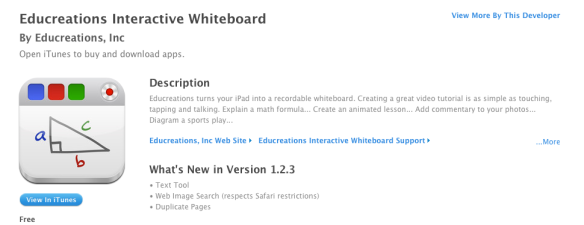
Educreations App Overview from iTunes

Educreations App Overview from iTunes

This whiteboard app is similar to ShowMe (www.showme.com), which I profiled earlier this week.  Educreations features a simple, straightforward user interface, which serves to lessen the learning curve for those new to the app.  Since this app is quite simple to use and also quite similar to ShowMe, I will not go through a step-by-step demonstration on how to make your own project.  I will, however, highlight the differences between ShowMe and Educreations.

First of all, Educreations offers users the capability to create slides within the presentation. For those who spend a lot of time generating slideshows, this will be quite familiar.  I actually prefer this capability to create separate slides within my overall presentation.  In ShowMe, I felt a bit less focused at times, since I had to have all my images/photos in place on the same screen and had to toggle between them as I recorded my presentation.  With Educreations, I can create several slides within my presentation, and I can focus on each slide separately as I record.  To see what this looks like, check out the presentation I made illustrating a simple Latin dialogue which uses key vocabulary words:

http://www.educreations.com/lesson/view/latin-vocabulary/1270717/?ref=link

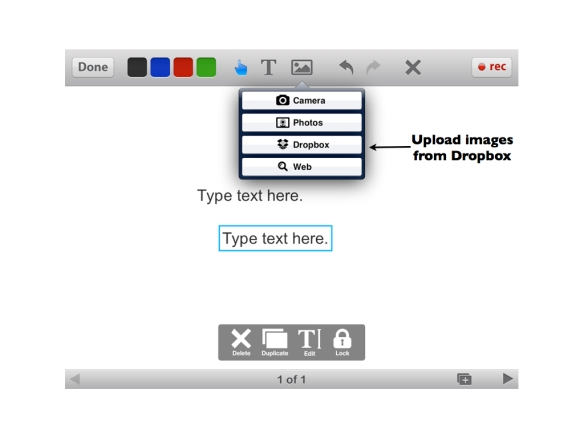
Secondly, users can upload images from their Dropbox folders/files (www.dropbox.com) to use in their Educreations projects.  Since I have the Dropbox app on my iPad and it is synced with the Dropbox folder on my laptop, I can easily access these images to incorporate into my projects.  And, with Educreations, just as with ShowMe, you can also access images directly from your device (i.e., “Camera Roll”/”Photo Stream”), you can search images on the web, and you can take pictures using your device.  Here’s a screen shot from the app illustrating this:

Educreations Screenshot Illustrating Dropbox Image Import Option

Educreations Screenshot Illustrating Dropbox Image Import Option

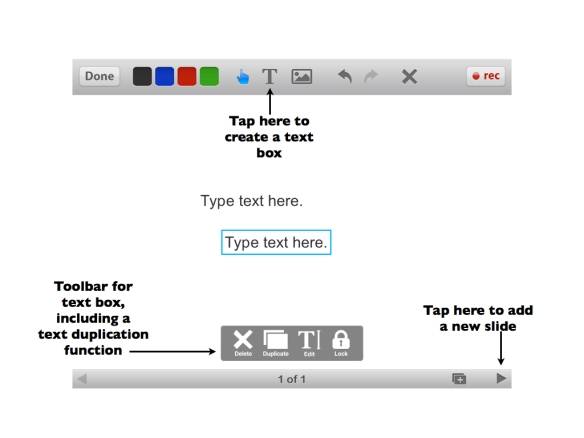
Educreations also allows users to type on the whiteboard by inserting text boxes; this is in addition to writing by hand directly on the board.  For those whose handwriting is atrocious (like mine!), this is a welcome feature.  I can type my main text as I am setting up my presentation (i.e., before I record), but I can also write/draw on the whiteboard by hand while I’m talking and recording my presentation.  Here’s a shot of this function on the app:

Educreations Screenshot Showing Text Box Function

Educreations Screenshot Showing Text Box Function

Once your presentation is complete, you can choose to make it public on the Educreations site or you can set it to private, so that only those to whom you give the project URL can view it.  This is identical to the public/private options in ShowMe.  The privacy option is very desirable when working with students in a classroom setting.  As a teacher, I feel more secure when I know that my students are using a web tool that provides a measure of privacy from the general public.  On the other end of the spectrum, with both apps you also have the ability to send your project to Twitter and Facebook, if you wish to post it to social sites.

One other difference I noted between ShowMe and Educreations is that ShowMe allows users to download their projects, thereby making it possible to view/show the projects offline and avoid internet connection issues.  Downloading also makes it easier to save and retain the projects for future use.  This is one feature that I would like to see in Educreations.  I did not readily notice this capability; if I missed it, please do comment on this posting (or e-mail at classappsblog@gmail.com) and let me know.

One last thing:  I made mention of Dropbox in this posting.  Dropbox is a convenient way to upload and share files from one device to another, and with multiple users.  It’s a free application, and can be used on desktop/laptop computers as well as mobile devices such as iPad.  For more, visit www.dropbox.com.

Addendum to Interactive Whiteboard Post

I just wanted to make an addendum to my earlier posting on the interactive whiteboard app ShowMe.  I would like to share with you one of my finished ShowMe’s, which is about jellyfish.  This was my first ShowMe and I think it will illustrate the point that even though I had never used this tool before, it was pretty easy to get in there and start creating.

Here’s the link to my project on the ShowMe site:

http://www.showme.com/sh/?h=GLL09Tc

Once your completed ShowMe has been saved and uploaded, you can send it to Facebook, Twitter, via e-mail, and also view it directly on the ShowMe site.  You can also download your ShowMe as an mp4 file for offline viewing (right now this is a beta function on the site).  Downloading your project is a great way to avoid the pitfalls of internet connection disruptions (especially if you’re using it in a classroom setting!), as well as a good way to save your creation for later use.